Showing posts with label cupcakes. Show all posts

Sunday, February 13, 2011

Bridal Accessories with a Wild Side

Let's face it, almost every one of us has a wild side, but very few are willing let everyone know about it, especially when it comes to a wedding theme. One of my very good friends recently got married and her theme was Zebra print and Pink. For a wedding you ask? Yes, and I will tell you, thanks to a lot of talented and creative people this color scheme looked amazing and was a surprising mix of fun and classy. Since I was lucky enough to attend the wedding, it was very cool to see everything come together.

When my friend told me about her theme choice, I knew she would need some custom designed invitations and luckily I had a friend who specializes in such matters. Kaleidoscope Design Studio is a graphic design company that specializes in custom design work for all of your needs from business to weddings. For this wedding, she created the most beautiful zebra and pink inspired bridal invitations, place cards, water bottle labels, and thank you notes! If you need Custom Bridal Invitations done, check this site out, she does amazing work!

Here is where I got involved. First up, since this friend is also a co-worker we threw a surprise shower for her at work. I of course was tasked with making the cake. For this I decided to do cupcakes. This friend is a huge fan of cakeballs but with the amount of people at this shower I couldn't make that happen. Instead I opted for basic vanilla and chocolate cupcakes with vanilla buttercream. To add a little fun I found black and white polka dot cupcake wrappers and I tinted the buttercream hot pink. To add an additional level of flair I used kitchen scissors to cut mini marshmallows and I dipped the sticky side in pink sugar crystals. I took of picture of them using the Hipstamatic App on my iphone and I love how the colors look so that it the picture I am sharing below.

I was so honored when the bride asked me to design the hair flowers for the bridesmaids and flower girls. Zebra print and pink seemed like a big challenge until I arrived at the fabric store and found a beautiful zebra print satin fabric. The rest was easy. For the bridesmaids, I opted for a pointy 5 petal flower using the zebra fabric as the petals. I accented the center of the flower with a hot pink rhinestone button. For the flower girls I went with my standard black satin hair flower with rounded petals. To incorporate the zebra print for them, I covered fabric buttons with the zebra satin and used them as the center. The bride and bridal party loved them. Since I was a guest at the wedding I also had the chance to see my hair accessories in action which was very cool. One of the bridesmaids was kind of enough to pose so you could see how this bridal party used the flowers. I listed the zebra flower in my etsy shop, you can find it by clicking here.


Today I have another formal hair flower design I want to experiment with. This idea was inspired by my brother's upcoming wedding where I have also been asked to create the hair flowers for the bridesmaids and flower girls. Since my daughter and I are included in that mix, be prepared for many pictures of those in action! This is not the best picture but I am going to add a twist to the red flower on this pattern.

I enjoy everything about making things for Purplelicious but designing custom flowers for weddings is my favorite. I like being able to think outside of the box, work with different fabrics, and experiment with various color combinations. Hopefully more of these custom orders will find their way to me in the future!

Thursday, February 10, 2011

Caramel Apple Cupcakes!

I realize that this blog has been a little heavy on baking experiments as opposed to sewing experiments, but don't worry. I have a few new accessory ideas that I would LOVE to tell you about, if I ever stop baking and work on one of those ideas. Ok, in keeping with the cupcake theme I decided to try a cupcake baking experiment. I feel like it is time to branch out from basic chocolate and vanilla, but really I had a tray of apple slices that I forgot to put out for my daughter's birthday party that were going to go bad. I could have easily used them to make a Jewish Apple Cake which are delicious and simple but I wanted a challenge. After all the easy route is never all that fun. I immediately thought cupcakes, through the power of google and the keywords "apple cupcake" I came across something that read, Caramel Apple cupcakes. Whoa, this got my wheels churning and I wanted an apple cupcake with a caramel buttercream. Sounds easy enough! I searched through a couple of different recipes until I found two that I liked. Each component belonged to a different recipe but I like piecing different things together. It keeps things fun.

Here is the Apple Cupcake Recipe. I must admit that I have rarely made a cake from scratch, I almost always use mixes. (I guess my secret is out now). As I was making this batter I was starting to get concerned. I have made enough cake mixes to know what cake batter looks like and that was not what was in my mixing bowl. This batter almost comes out like a cookie batter. When it was done I re-read the recipe several times to make sure I didn't miss a step. My tips if you are working with this recipe: Slowly add your apples, too many will cause the "batter" to come apart which causes them to crumble in the wrapper after they are baked. Also it might not hurt to spray the liners with a little cooking spray. (I learned this trick one time I tried to make brownie bites in cupcake wrappers). Despite the less than perfect baked cake result they tasted amazing!


Now onto the buttercream. Here is the recipe I used for the Caramel Buttercream. I didn't realize what I was getting myself into here until I was about halfway into making the caramel. The recipe says to make the caramel using the microwave, this made me nervous for some reason so instead I made it on the stovetop. I cooked the ingredients over low heat. This took a while, but I was patient and I just kept stirring. I put a lot of love into this caramel. Then I realized I should have been using a candy thermometer. The recipe says its done when it is thick and bubbly which seems easy enough to decipher but it isn't. My concern was that I was going to cook it too long and end up with hard caramel that wouldn't mix into the buttercream. Fortunately I lucked out with this. As it cooled it was still smooth. If you make this I would suggest using a candy thermometer JUST to make sure you don't cook it too much. Also this recipe makes a LOT of caramel, you can probably cut the recipe in half unless you like having a lot of caramel around the house. The buttercream is very easy to make and the caramel mixes right in. I added the 1/4 cup and tasted it, I felt like it needed more caramel, I kept adding a little at a time until I felt like the flavor was there.

Here is what they look like cut in half. They are very rich and have a very buttery apple taste. The buttercream is a good compliment to the cake. At one point it tasted like apple pie a la mode. I brought them into work and they were devoured in less than 10 minutes, that makes me think they were pretty good. If you decide to make them if you have any other tips feel free to share! Enjoy the caramel apple deliciousness!

Sunday, June 13, 2010

"The Pigeon Finds a Hot Dog" Cupcakes

It is just terrible that I have not posted a blog since January. I would promise to try to get better at it but I don't want to let you down. I do have some cool projects I am working on that I want to share with you so there may be hope for me yet!

A couple of weeks ago, I picked my daughter up from school and she was beaming with excitement. It was finally her turn to be student of the week. She was actually the last one in her class to have a turn but I was told later by the teachers that being the last kid is a good thing. It means they are patient enough to wait for their turn.

The first project was Bella's all about me page. For this I took out all of my scrapbooking supplies. This is where I am grateful for my craft supply hoarding tendencies. You never know when you are going to need fun paper and letter stickers! We also used some crayons and Bella really enjoyed making a rainbow design for all of the borders. My favorite part about this is when asked if she had one wish what she would wish for, she put Sun and Hugs. That's my girl!

For the rest of the week we needed to send in various things that are Bella's favorites. The "main event" of the week was when I got to go into her class and read them a story. This also entails bringing some sort of snack for the class too. All along Bella knew she wanted me to make cupcakes but we were a little undecided about what book I was going to read. Being the last kid, a lot of her books were already read to the class with the exception of the Pigeon books, by Mo Willems. Those books are pretty much our favorites around here. I like the pigeon because he has so much attitude and it is really fun to bring that out when you are reading them. You can read more about them here: http://www.pigeonpresents.com/

So being the overachiever that I am I decided to make cupcakes that matched the books. Being the last student of the week I felt it was a go big or go home situation. After a consultation with my fellow baker brain stormer, my sister, she sent me a picture of a hot dog made out of candy. It was decided. I would read the 4 pigeon books to the kids, finish with "The Pigeon Finds a Hot Dog" and give out the cupcakes!

Here is how I made the "hot dogs". Again I will add that I did not come up with this idea, it was based on a picture I found on flickr. Basically you need circus peanuts, tootsie rolls, icing tinted yellow, and green sour patch kids. It is a pretty easy process. Cut the circus peanut in half, but not all of the way and then work the tootsie roll in. Pipe a little yellow icing to look like mustard, then add cut up green sour patch kids for the "relish". Here is a picture of the "hot dogs" all lined up and ready to be cupcake toppers.

For the cupcakes I made a batch of vanilla and a batch of chocolate. With 26 kids in the class, there is no way around making 48 cupcakes! I just swirled some homemade vanilla butter cream on them and topped each cupcake with a "hot dog". Here is the final product.

I had such a blast reading to the kids. I was a little nervous at first, I am not sure why. But I could tell for Bella it was so amazing to have her mom come in and sit in her teacher's chair and read to her class, even though I embarrassed her when I really got into acting out the pigeon! Here are some photos of us reading to the class. They were scanned so I apologize for the quality. The kids got a kick out of the cupcakes and so did the teachers. Even though right after this I had to rush into work and had 30 minutes to prepare for an impromptu meeting, it was completely worth taking the time out of the day to be there for Bella and also a great excuse to make another creative cupcake!

Thursday, November 26, 2009

Turkey For Two!

About a month ago when I was talking to my mom I realized that there was a pretty good possibility that I would be alone this Thanksgiving. Most of my family was going to be out of town visiting other family members. I had the opportunity to go to Florida with my parents and join the rest of my family there but since I just started working again, I have limited vacation time and would have had to fly out on Wednesday. NO THANK YOU. Instead I saw these couple of days an opportunity to spend some much needed time with my little one. With me working and her being in school we are lucky if we get an hour a day together before we both fall asleep and start the day over again. I am so very grateful that I got many other offers to spend Thanksgiving with others but chose a relaxing day with my favorite person on this planet!

We started the day with a trip to the movies. We went to see A Christmas Carol in 3D of course. I thought the movie was very well done, the actors did a great job, and the 3D effects were really awesome. But it was kind of dark and Bella was scared for most of it. I could feel her shaking at some points. During the movie I felt bad for taking her but at the end when I asked her if she liked it, she said she really did. She was surprised that I was surprised by her response. I guess if she liked it then that is all that matters!

Then it was time for me to get cooking. Bella requested that I make turkey for Thanksgiving. Now I was not even sure if she would like it but I made it anyway. I bought a little 7lbs turkey breast and made us a little turkey dinner. I roasted the turkey with baby carrots and potatoes. Last time I checked she liked carrots and potatoes but all she ate for dinner was a few pieces of turkey and refused to let me put gravy on it. She is SO picky. I can honestly say that she does not take after me when it comes to food! Overall I think our little turkey dinner for two was quite delicious! I can't wait to make my favorite turkey leftover sandwich tomorrow!

We ended the evening with one of my favorite activities to do with her...bake cupcakes! We made devil's food cupcakes. I taught her how to crack eggs tonight and she did one perfect on her own. My little baker prodigy! I decided to make homemade chocolate buttercream icing because I love it. And I remembered that I bought a new large star icing tip that I had not used yet. I LOVE how the icing looks using the bigger tip, they look more professional. They taste so good, I need to find a way to get them out of my house so Bella and I don't eat them all!

As much as I am thankful that I have a great family I can honestly say that I truly enjoyed having a day that celebrating my little family. Sometimes it is nice to take a break from all of the craziness and enjoy the holidays for what they are about, celebrating with the ones we love. Happy Thanksgiving Everyone!

Sunday, July 26, 2009

Craft Show Tour, A Phillies Game, and A New Baking Adventure!

Ok I did warn you all that I was blogging at an average of 1 blog every 2 weeks, right? Well I think it might have been a little longer than that but hey, I am a busy girl! July has gone by with a blur, like usual time flies when you are having fun!

I am happy to report that I survived my brief craft show tour and both shows were incredibly successful! First up was the Haddonfield Fine Arts and Crafts Festival. I was so excited when I found my booth space as it was in a great spot on Haddonfield's Main Street! The show went great! Not only did I sell a lot of accessories it was great chatting with customers who not only remembered my booth from last year but remembered the location! Now that is loyalty! The biggest seller at this show, my fabric flower ponytail holders. In between customer interactions I sat at the booth and made more. As soon as I would put some out, they would sell. I think I sold about 30 of them most of which were made at the show! I have been busy making more since some of the shops selling my stuff are going through them quickly too! Thanks to all of the fabulous people that helped support Purplelicious at the Haddonfield Show, I look forward to seeing you next year. I hope you all remembered my booth location, there will be a quiz next year!

The next stop on my craft show tour was the Handmade Faire. It was held at Freedom Park in Medford NJ. This park is awesome and also the location for many of Medford's events including their Relay for Life and their 4th of July Fireworks! The show was organized by my Etsy Friend Abbie and her mother in law Pola. And I have to say they put together an AMAZING show! There are so many things I liked about the show. For starters, ALL of the sellers sold handmade items, which is great to see. A lot of major craft shows add this as a requirement but I think a lot of non handmade sellers still manage to get in. At the Handmade Faire I just felt this sense of community that I don't usually feel at craft shows. That could also be because I knew some of the sellers from the EtsyNJ group! I think my favorite aspect of the show was the music. The theme of the show was Summer of Love and Abbie put together an incredible mix of songs from the 70s. I was in heaven! And the crowd loved it too, it was cool to see people dancing and singing along to the music! I also had a very successful show! Which is also nice! Congrats to Abbie and Pola on a great show, they estimated about 8000 people came to the event and I believe plans are already in the works for a Fall edition in October! I have already marked my calendar! Here is a pic of me in my booth!


Last week we ventured to another Phillies game! It was a business person's special and also the Kids Run the Bases game. It was during the day on Wednesday. Unfortunately the Phil's put an end to their winning streak that game but Bella had a blast running the bases. How it works is after the game all of the kids leave the park and get in line to come back into run the bases. The line was literally wrapped around the ballpark but moved pretty quick. You get to walk down the ramp by right field and onto the field. The kids run around the bases, the parents meet them at home plate and you are done! Bella got a certificate as well. I was surprised she did it, but as soon as she hit the field she was off running! I took some video and realized that I captured her on phanavision as well. Very cute! Here are some pictures of her from the game. Notice the baseball headband! ;-)
Headed in the park!

Walking down the ramp to the field!

On the field about to run the bases!


The final leg of my 3 weeks of madness was a new adventure in baking! My cousin's baby just turned 1 and she asked me awhile ago if I would make all of the desserts for his birthday party. I was so excited! I love to bake and especially love creating baking and cake decorating! When she told me the party was a puppy theme, I was ready for the challenge! Here is what I came up with:
The Main Birthday Cake:

Sugar Cookie Dog Bones for the Treat Bags:

Personal Mini Dog Cake for the birthday boy to destroy:

Cupcakes with a Mini Dog Bone Sugar cookie:

To say that everything was a hit would be an understatement. I definitely like my fair share of praise but I was getting so much, I started to blush a little. It was so rewarding to see my cousin so pleased with everything and little Owen loved all the doggie themed treats!

After three weeks of fun, like usual, I still have miles to go before I sleep. It keeps my life interesting though, I am not sure I would know what to do if life wasn't always busy! I do have one goal, I hope to get back on a regular blogging schedule, we will see how that works out!

Friday, May 15, 2009

Tie Dyed Cupcakes!

My daughter LOVES the book Pinkalicious, we read it pretty much every night before bed. We have also made our fair share of pink cupcakes, green cupcakes, and even purple cupcakes. The other night we were reading the book and she asked me if I could make rainbow cupcakes. I had never made anything like that before so I was up for the challenge. Last night when I picked Bella up from school she asked me if we could make them. Since I still had blurry vision from my eye doctor appointment and needed a break from all of the craft show prep I said yes! I was not 100% sure how I was going to master this BUT luckily I remembered a blog I read that detailed how to make a rainbow cake so I applied the same principles. If you want to read about how to make that cake, here is the link: http://www.omnomicon.com/rainbowcake.

Ok, here is what I did.
*I used a White Cake mix, since I have made different color cupcakes before I have found tinting the white is much easier than the yellow for obvious reasons. My 5 year old was part of the process so I will share how she "helped" in case you plan on doing this with your child! I followed the cake mix directions on the box and let my daughter add the ingredients, which I measured out in bowls so she could add them without mess.
*Once the batter was made I divided it into 6 bowls. I used about 1 cup of batter for each bowl. Then divided what was left evenly among the bowls.
*Then I tinted each of the bowls with a different icing color. I added the color and I let my 5 year old mix it in. Try not to overmix here, once you have the color well blended let it be! I used Wilton Icing colors since I have them on hand. I did use a store bought orange which worked fine too!
Here is a pic of what the batter looks like!

Now for the fun part, making the cupcakes! My daughter and I had some power struggle here for the best way for her to help but this is what worked best.
*Fortunately I have 2 cupcake pans so I can make all 24 at once. Add the cupcake wrappers, I recommend using white since the wrapper looks cool after it is done.
*Start with the red first. I used 2 tablespoons or soup spoons I guess you would call them. I filled about half of the spoon with the red batter then had my daughter scrap it off with the other spoon. This way she could help and the batter got where it needed to be. I would suggest using less than more, since that one bowl has to fill 24 cupcakes. By looking at the picture below you can see how much batter I used per color.
* I did the orange next, using the same process and put the batter next to the red. Then continued with the other colors, basically just layering the batter and the colors.
Here is a pic of what they looked like before they went into the oven.

I contemplated for a hot second to use a toothpick and swirl the batter but I wanted to see how these came out. In retrospect I should have done that on half of them to see what the result would have been.
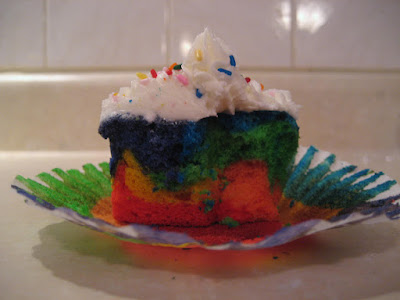
Here is what they looked like when they came out of the oven! See what I mean about using the white wrappers! When you peel off the wrapper it looks even cooler!

To ice them I just made the Wilton Buttercream recipe and my daughter added some rainbow sprinkles on top. I have taken two pictures of what they look like on the inside...so cool!


I hope this blog was easy to understand, this is the first instructional blog I have written! The process is really easier than it looks and I am sure I am not inventing the wheel here but some of my friends wanted to know how I did it. The kids in my daughters class were so excited to eat these cupcakes and they were definitely so fun and easy to make! Enjoy!

Wednesday, March 18, 2009

A Green Kind of Day

St Patrick's Day has come and gone but I hope that I did what I could to make it fun for my daughter! For some reason on Monday I was feeling a little creative, and I was not feeling headband or accessory creative! I was trying to think of fun things to make for Bella for St Patrick's Day. Creative Idea #1: Cute Handmade St Patty's Day Shirt. I realized Monday morning that I had not gotten around to purchasing a St Patrick's Day shirt for Bella. I figured the stores would be out of them so I decided to make one myself. I had a plain white t-shirt for her, stared at the un-used St Patrick's Day cookie cutter and was hit with inspiration. I went up to the craft room and found the green non-shamrock fabric I purchased and placed the cookie cutter over it. Perfect!!! I washed a section of the fabric. Ironed on some heat n bond, traced the cookie cutter, and an adorable fabric shamrock was born. I felt like it was too plain so I found some St Patrick's Day ribbon and made a bow. Then I asked my fellow Internet and Etsy friends to help me decide. Bow or No Bow! Well the Bow won and here is a pic of Bella in her handmade St Patrick's Day shirt. And yes I think I will sell these next year!

Creative Idea #2: Cupcakes for Class St Patty's Day party. One of the things that is challenging for creative people is that the bar is always raised. Once you come up with one good idea you have to brainstorm on how to make it the same or better, which isn't always easy. I don't know why I feel the need to show off when I bake but it is fun for me! This year I decided to add a chocolate shamrock as a cupcake topper. I headed to Michael's and of course they were out of green Wilton chocolate melts so I was forced to buy white chocolate and tint it green myself. Which was easier than I though. Now I had the chocolate but how was I going to make shamrocks. I am not much of a free hand artist. So I found a shamrock outline graphic printed them out and placed it under a sheet of parchment paper. Put the melted chocolate in a piping bag and traced the outline. I need more practice at this but I think that part came out cute. I baked the funfetti cupcakes (the cake mix picked by Bella) and then made a fresh batch of buttercream. It is so easy to make it I hardly ever use tub icing anymore. I piped the icing in a swirl design, added another swirl of the new Wilton Sparkle Glaze, and topped it with a chocolate shamrock! Fun and delicious!!

I ended my St Patrick's Day but going to the gym for spinning class. When you are a single mom, partying on St Patty's Day doesn't happen to often. I was reminded of my years working in the beer industry when St Patrick's Day was practically considered a holiday. We always had a half day and ended up drinking beer somewhere! Good times!

For someone who is not even an ounce Irish I think I did some pretty creative things for the holiday! I really enjoy the days when I have these creative inspirations. It is another benefit of being unemployed I guess...I actually have the time to turn the inspirations into reality!