Ok, here is what I did.
*I used a White Cake mix, since I have made different color cupcakes before I have found tinting the white is much easier than the yellow for obvious reasons. My 5 year old was part of the process so I will share how she "helped" in case you plan on doing this with your child! I followed the cake mix directions on the box and let my daughter add the ingredients, which I measured out in bowls so she could add them without mess.
*Once the batter was made I divided it into 6 bowls. I used about 1 cup of batter for each bowl. Then divided what was left evenly among the bowls.
*Then I tinted each of the bowls with a different icing color. I added the color and I let my 5 year old mix it in. Try not to overmix here, once you have the color well blended let it be! I used Wilton Icing colors since I have them on hand. I did use a store bought orange which worked fine too!
Here is a pic of what the batter looks like!

Now for the fun part, making the cupcakes! My daughter and I had some power struggle here for the best way for her to help but this is what worked best.
*Fortunately I have 2 cupcake pans so I can make all 24 at once. Add the cupcake wrappers, I recommend using white since the wrapper looks cool after it is done.
*Start with the red first. I used 2 tablespoons or soup spoons I guess you would call them. I filled about half of the spoon with the red batter then had my daughter scrap it off with the other spoon. This way she could help and the batter got where it needed to be. I would suggest using less than more, since that one bowl has to fill 24 cupcakes. By looking at the picture below you can see how much batter I used per color.
* I did the orange next, using the same process and put the batter next to the red. Then continued with the other colors, basically just layering the batter and the colors.
Here is a pic of what they looked like before they went into the oven.

I contemplated for a hot second to use a toothpick and swirl the batter but I wanted to see how these came out. In retrospect I should have done that on half of them to see what the result would have been.
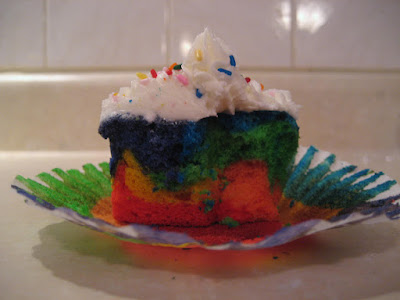
Here is what they looked like when they came out of the oven! See what I mean about using the white wrappers! When you peel off the wrapper it looks even cooler!

To ice them I just made the Wilton Buttercream recipe and my daughter added some rainbow sprinkles on top. I have taken two pictures of what they look like on the inside...so cool!


I hope this blog was easy to understand, this is the first instructional blog I have written! The process is really easier than it looks and I am sure I am not inventing the wheel here but some of my friends wanted to know how I did it. The kids in my daughters class were so excited to eat these cupcakes and they were definitely so fun and easy to make! Enjoy!
This is fab! My friend is graduating tomorrow and, despite her age, she LOOOOVES rainbows, so I'm thinking this might be a cool little "extra" I can do to congratulate her ;) It's not wrong to give your graduating Dental Hygienist friend cupcakes as a gift...right? Meh, I'll just bring her a backup toothbrush in case...
ReplyDeleteThanks! I think it is ok! Since she is now a dental hygienist she will know how to rid her teeth of all of the sugar!! Have fun making them and congrats to your friend!
ReplyDeleteSeriously, very cool- thanks for sharing! :)
ReplyDeleteThanks so much for posting this! We can't wait to make them for ourselves...YUM!!
ReplyDeleteThat looks like it was so much fun. I am going to try to make them with Teagan. You are just the most crafty mom I have ever met!
ReplyDeleteMade these for my daughter's preschool class last week. The kids were floored and begged me to teach their moms how to make them. My daughter also got a kick out of making them...and, of course, licking the bowls. ;)
ReplyDeleteYay! I am so glad they were a hit! My daughter liked licking the bowls too, it might have been her favorite part!!
ReplyDeleteVery cool! I want to make them this weekend for my daughter's 8th bday party that is the tie dye theme.
ReplyDeleteI am so excited to find this recipe. You did a great job of explaining! My daughter will have her 6th "groovy" birthday party Saturday before Mother's Day. All the cake shops here are booked so I have to do it myself! I started searching for something and found this. Thank you, again!
ReplyDeleteHow do they taste with all that food coloring in the batter to make them that (bright/dark) in color??? Did you have to adjust cooking time for the cupcakes to compensate for the added moisture???
ReplyDeleteI really absolutely love these cupcakes!
ReplyDelete;)
Totally awesome cupcakes! I had no idea one could color them so wonderfully! It's a nice Christmas solution!:)
ReplyDeleteI am twelve and just started to read your blog!! I totally LOVE IT!!! I can't wait to do this today I absolutely love to bake and this looks like sooo much fun!!!
ReplyDelete