While this is a philosophy I have been practicing a lot since I have been unemployed I feel like it really held true this weekend! For starters while I continue to struggle to find a job in this horrible economy I have my accessories business. When I am not job searching I am plugging away trying to build and expand it. I know that all of the little things I am doing will eventually add up so I am trying to practice a little patience! I was excited to work on some custom orders this weekend. The first was an order for 20 of my Princess Headbands. They are being used as party favors for a little girl's birthday party! Such a great idea!
The second custom order was a request for headbands made with Madras fabric. It was like this customer was reading my thoughts, I was in the fabric store the other day and saw the madras fabrics and wanted to buy them but wasn't sure if they would sell! Well this customer gave me the excuse I wanted to buy the fabric! I also tried out a new design and also covered the elastic. I bought some other lightweight summer fabrics and plan to launch them all together once all of the samples are done. But here is a sneak peak of the madras styles to be listed soon!
The third custom order is a special request to have this bridal satin fabric flower hair clip made in ivory to match bridesmaids dresses that are black and ivory. The hair clip are still in progress but I am excited about this request and I hope it leads to more bridesmaid hair clip orders in the future.
This Memorial Day Weekend was not all about sewing, yard work was the main item on the agenda. Since I am unemployed and have very little disposable income hiring a landscaper is out of the question. My ex husband was not much help either even though he has helped me in previous years but hey, I don't need no stinkin' man! Since I am young and able bodied I became my own landscaper for 2 days. I cut the grass for the first time ever, cleaned up the mulch beds and added new mulch, and bagged about 25 bags of leaves. I am paying the price for being lazy with my leaf cleanup in the fall. There is still so much work to be done. I was secretly hoping for rain so that I would have an excuse to stay up in my sewing room instead of being out in the sun bagging leaves! I got my wish today!
I was enjoying a cold rainy day in my sewing room making custom orders. I decided to also put the finishing touches on the purse I blogged about a few weeks ago. I added a snap closure so I had to take out the lining seam. When I went to sew it back up, it got stuck in my machine and my sewing machine got all out of whack and kept breaking the needle. I immediately packed it up and took it to my mom. Both of my parents were eager to help repair it since it is the tool that has helped provide my main source of income these days. We pretty much took the entire thing apart and my dad somehow figured out how to fix the issue and when I put it back together it was in working order! It runs awesome now because we cleaned all of the lint out. I wish I had a picture of what my poor little machine looked like all torn apart, but I am glad she is all better! Although my mom was pretty much on board with getting me a new machine since she bought mine like 8 years ago for around $99, she is actually impressed it is still going strong after all of the sewing I have done with it!
So I guess that is pretty much what life is about, making the best out of the cards that you are dealt and staying positive. Sometimes doing that takes a little more effort, but all of that hard work will definitely pay off in the long run!
LuLaRoe Independent Fashion Retailer, Married with 1 daughter and 2 stepdaughters, Crossfitter, and Overachiever! Join my LuLaRoe VIP Page to get access to all of the amazing pieces in my inventory! http://www.facebook.com/groups/lularoemarisabaselice
Tuesday, May 26, 2009
Friday, May 15, 2009
Tie Dyed Cupcakes!
My daughter LOVES the book Pinkalicious, we read it pretty much every night before bed. We have also made our fair share of pink cupcakes, green cupcakes, and even purple cupcakes. The other night we were reading the book and she asked me if I could make rainbow cupcakes. I had never made anything like that before so I was up for the challenge. Last night when I picked Bella up from school she asked me if we could make them. Since I still had blurry vision from my eye doctor appointment and needed a break from all of the craft show prep I said yes! I was not 100% sure how I was going to master this BUT luckily I remembered a blog I read that detailed how to make a rainbow cake so I applied the same principles. If you want to read about how to make that cake, here is the link: http://www.omnomicon.com/rainbowcake.
Ok, here is what I did.
*I used a White Cake mix, since I have made different color cupcakes before I have found tinting the white is much easier than the yellow for obvious reasons. My 5 year old was part of the process so I will share how she "helped" in case you plan on doing this with your child! I followed the cake mix directions on the box and let my daughter add the ingredients, which I measured out in bowls so she could add them without mess.
*Once the batter was made I divided it into 6 bowls. I used about 1 cup of batter for each bowl. Then divided what was left evenly among the bowls.
*Then I tinted each of the bowls with a different icing color. I added the color and I let my 5 year old mix it in. Try not to overmix here, once you have the color well blended let it be! I used Wilton Icing colors since I have them on hand. I did use a store bought orange which worked fine too!
Here is a pic of what the batter looks like!
Now for the fun part, making the cupcakes! My daughter and I had some power struggle here for the best way for her to help but this is what worked best.
*Fortunately I have 2 cupcake pans so I can make all 24 at once. Add the cupcake wrappers, I recommend using white since the wrapper looks cool after it is done.
*Start with the red first. I used 2 tablespoons or soup spoons I guess you would call them. I filled about half of the spoon with the red batter then had my daughter scrap it off with the other spoon. This way she could help and the batter got where it needed to be. I would suggest using less than more, since that one bowl has to fill 24 cupcakes. By looking at the picture below you can see how much batter I used per color.
* I did the orange next, using the same process and put the batter next to the red. Then continued with the other colors, basically just layering the batter and the colors.
Here is a pic of what they looked like before they went into the oven.
I contemplated for a hot second to use a toothpick and swirl the batter but I wanted to see how these came out. In retrospect I should have done that on half of them to see what the result would have been.
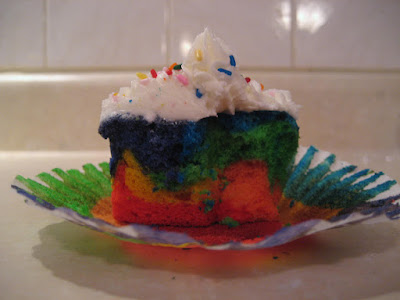
Here is what they looked like when they came out of the oven! See what I mean about using the white wrappers! When you peel off the wrapper it looks even cooler!
To ice them I just made the Wilton Buttercream recipe and my daughter added some rainbow sprinkles on top. I have taken two pictures of what they look like on the inside...so cool!
I hope this blog was easy to understand, this is the first instructional blog I have written! The process is really easier than it looks and I am sure I am not inventing the wheel here but some of my friends wanted to know how I did it. The kids in my daughters class were so excited to eat these cupcakes and they were definitely so fun and easy to make! Enjoy!
Wednesday, May 13, 2009
Texas Sized Fun and Some New Accessories Too!
This past weekend I was in Austin TX for my cousin's wedding. I was excited for the weekend for a few reasons. One because I have not been away since November, being unemployed tends to put a damper on spending. And two I have never been to Austin TX and it is a place I have always wanted to go. It is after all the Live Music Capital of the World! For only being there for the weekend, I got to experience some different aspects of the city. On Friday night after the rehearsal dinner we did a bar crawl. We ended up at this great place that looked like it was wedged between two buildings. The band was AWESOME, they played 80's music, it was great! On Saturday, before the wedding my sister and I walked around by the University of Texas, we only got to see a small section but it was so fun. We had the most fun in this little boutique called Wish. They have the most adorable clothes and all of these fabulous earrings for $3.50 each! So fun! While trying to find a cab we stumbled up on this amazing popcorn store called Cornucopia. Oh my...some of the best popcorn ever! They have so many different flavors, I went with traditional cheddar and my sister got the candy coated Cherry, but their most popular is Dill Pickle and I can see why, it was delicious! I will definitely be placing an order with them soon. The wedding was so beautiful and fun. The band at the wedding was actual a band that only plays the Beatles. They were really good and the dance floor was packed the entire night! The next morning, I did not want to leave! I would have loved just one more day to explore, but I guess now I have a great excuse to go back!
Now onto the real important stuff, my dress and accessories!!! In anticipation of the event I of course had to find a dress! I was able to find an amazing Sue Wong dress in one of the Rue La La boutiques and got a $300 designer dress for $88. The dress is brown and purple which I was also happy about since I always seem to wear black to weddings! I knew the kind of jewelry I wanted to wear with the dress but knew I would not be able to find it in a store. So I reached out to some talented Etsy Sellers and Megan of CastoCreations designed the most beautiful earring, necklace, and bracelet set. It was not only exactly what I wanted, it looked completely AMAZING with the dress. I got so many compliments on the jewelry and everyone was blown away when I told them it was handmade. Her shop is also filled with some amazing jewelry pieces. If you are in the market for some beautiful jewelry, visit her shop on Etsy! I also wanted to experiment with a new hair accessory. I made a fabric flower out of brown satin and accented it with a crystal purple button and attached it to a hair clip. It looked adorable in my hair, but it was hard to notice because my hair is also brown. Next time I may choose purple satin over the brown but it was still cute nonetheless and I now have a new hair accessory style to add to the shop! Below are some pics from CastoCreations of the jewelry she made for me, a close up of my hair accessory, and one of me wearing all of the pieces!
I definitely had some Texas Sized Fun and was dealing with some Texas Sized Exhaustion when I got home, but it was a great trip! Best Wishes of love and happiness to my Cousin and his new wife!
Sunday, May 3, 2009
I Made my First Purse!
A few months ago I was visiting my mom at her quilter's guild quilt show and I was talking to the owner of my favorite quilt shops, The Little Shop. The owner commented on my purse, she said it was similar to the Amy Butler Birdie Sling Bag and mentioned she was having a class on how to make one. I told my mom about it and she signed us up for the class. I was excited on a couple of levels, first because I have always wanted to learn how to sew a purse, and two I thought it would be fun to take a sewing class with my mom! Making a purse is a lot more work than I had anticipated! I don't know how the Purse Sellers on Etsy do it!
For me the hardest part was picking out the fabric. This bad is more of a tote than an everyday bag but I still was very picky about the fabric. I ended up going with a fabric called 1974 by Urban Chicks for Moda. I paired it with a solid purple for the bands and the straps. Then used another moda pattern for the lining. If I could do this purse again, I would use the solid purple also for the lining and use the exterior fabric for the pockets. Oh well, maybe next time! We cut everything before we went to class, that way we could get right to sewing! It helps that my mom has lots of experience taking sewing classes! Here is a pic of all of the fabric cut out.
The class was two 3 hour sessions. After the first class I had the lining sewn together and had made the pockets. I actually got a little carried away with one of the pockets. I sewed a few more lines to make a pocket for my cell phone, my lip balm, and my business card case. Here is a pic of where I was after the first class.
Before the second class I had to finish top stitching the lining and sew and top stitch the band. I am glad I did that because there was a lot left to do in the second class. I was excited to work with the exterior panels because then I would get to see what the purse would look like. I learned how to make pleats, which was easier then I thought and how to make gussets at the bottom of the bag. I really started picking up the pace towards the end of the class because I wanted to finish it while I still had an instructor and I didn't want to leave with a UFO (Un finished object!). I was able to finish the purse by the end of the class with the exception of one 3" section. My sewing needle broke while I was doing the last but of top stitch. When I got home, I finished it. Here is a pic of the final purse.
I LOVE how it turned out and am so proud of myself! I need to add a clasp on the inside to keep it closed and I plan on adding a fabric flower made from the main fabric to the purple part. I bought an awesome purple button for the center of it. My mom and I also want to make some modifications to the pattern. We used fusible fleece on every piece of the bag but think interfacing on the exterior pieces would be best. I don't think I will sell purses anytime soon but now they I know what to do, I can definitely use those skills to make some cute purses as gifts or even for myself! A girl can never have enough purses!
Labels:
amy butler,
birdie sling bag,
purse making,
Sewing,
sewing class
Saturday, May 2, 2009
Custom Order Month!
One of the many things I love about having this business is that I often get asked by people to make them custom accessories. It seems that April was the month for custom requests. The first request was for a headband that needed to match a kids white t-shirt with navy/white gingham bows and crystals. I had so much fun making this headband because it was something compeletly different then what I am used to making. Here is a pic of how it turned out. Super cute!
Then I received a wholesale request for 15 ribbon belts. The trick with these was the customer asked that each side be a different ribbon and they didn't need to coordinate. It was fun to mix and match and use some ribbons I have not yet used for belts but will be using in the future!
Finally the order that took up the most time but was so fun to make...custom embroidered soccer team headbands! The coach wanted to give the girls on his team a headband as a gift at the end of the season. We went back and forth with ideas and then came up with using Shamrock ribbon (their team is called the Shamrocks!) embroidered with the player's name on one side and the season on the other. Then he decided to get some made for the player's sisters. For them I just embroidered the name on the center of the headband. And of course the mom's couldn't be forgotten! They got plain shamrock ribbon headbands. All of the ribbon was sewn onto Goody Stay Put Elastic Headbands so while the girls are playing, the headbands stay in place! It was so fun working on this order and I think they came out super cute! So if you are looking for a unique custom embroidered headband for your child's soccer, basketball, softball, or any sport team contact me!
The thing that I love most about custom orders is that it gives me a chance to come up with some new ideas, try something new, and even buy some new fabric. It is great to work directly with the customer and make them exactly what they are looking for! Hopefully this is a sign that many custom and large orders are on their way! I sure hope so!
Subscribe to:
Posts (Atom)